Halloween is a time for spooking and scaring your friends and family, but it’s also the perfect time to scrap!
Now is a good time to get creative with your Halloween scrapbook layouts! There are so many fun things you can do to dress up your pages, from using Halloween-themed embellishments to including photos of yourself in costume.
If you’re a newbie to scrapbooking and this is your first time creating a Halloween layout, don’t worry about having to use complicated techniques. Just take your favourite photos and crafty embellishments and add a little spookiness to them!
So, if you’re in the mood to make some Halloween scrapbooking layouts, check out this post for inspiration!
Affiliate links are contained in this post. If you purchase through these links, I earn a small commission, at no cost to you! Please read my disclaimer for more info.
Ideas for Halloween scrapbook page layouts
Most of the ideas in this post are about the trick-or-treat part of Halloween. But here are so many different memories of Halloween that you might want to capture.
Here’s a list of 10 journal prompts for Halloween that you might like to capture:
- The story behind picking the perfect Halloween costume
- The home decor that you display at this time of the year
- The decorations that you may adorn the outside of your house with
- The process of making a costume
- Your favourite Halloween candy
- Any Halloween traditions you may have
- A scary movie you love to watch on Halloween
- The story behind your pumpkin carving design
- Your favourite Halloween memory from growing up
- A scary story that you used to tell at Halloween
Halloween memory keeping would be amazing to look back on in years to come. Now, let’s get onto the Halloween scrapbook page layouts!
5 Spooky Backgrounds
There’s something about spooky backgrounds that just screams “Halloween!” Whether you’re looking for a scrapbook layout page to capture your favourite Halloween memories, or you’re just looking for some inspiration to get in the spirit, these creepy and cool backgrounds are sure to do the trick!
From dark and dreary forests to abandoned houses and eerie cemeteries, these spooky scrapbooking backgrounds are perfect for creating a spine-tingling layout. You can find all sorts of different textures and designs, from swirls and vines to spider webs and skulls, so you can create the perfect look for your page.
If you want to create a truly haunted feel, try using light effects like mist or flames to set the scene. Or add some scary stickers or graphics to really bring the background to life.
Here’s the first Halloween scrapbook layout for spooky inspiration! The vignette on the edges of the background patterned paper gives a dark and mysterious tone to the layout. Perfectly matched with the gates that look like they are opening into an abandoned area!
In this first layout, I really like the spider web in the corner. To save a little bit of money, you could buy a large one and cut it into quarters to use in multiple corners or on multiple layouts.
Here’s another layout that features a spooky background! The spiders and webs on the background are enough to scare anyone! One of my favourite parts of this layout is the orange concertina flower in the centre.
If you love the effect of the spider web, but can’t find this paper, consider using a blank piece of kraft cardstock and drawing your own!
The next layout features a black background and some more spider webs! The effect of the grey webs on black looks fantastic!
The thing I love about digital scrapbooking is you can cute embellishments over and over again. This is a great way to make your supplies go further!
The next layout with a spooky background uses mists and ink. The striking part of this layout is using the ink to mimic drips down the page.
The other eye-catching detail is the use of muslin or loosely woven material under the title block and photo. Sticking this to your layout can be a little tricky as you might end up with glue blobs on your page. I like to hide the adhesive underneath something, just like the title block or photo.
Now for one last layout to round out the spooky pages! This layout has it all! There are ravens and witches, spiders, dead trees, and vignette edges to bring a little bit of the spook.
The contrasting green to pick up the colour in the photo is a fantastic idea to make this layout pop. The best part is the perfect title. So much fun.
5 Scary Background Papers
Ok, so this section will be less about scary background papers and more about different paper techniques to give you ideas for your Halloween scrapbook pages.
There are so many different techniques you can use on your Halloween scrapbooking pages. You can tear, cut, shape, and ink your papers to create a great background.
This next layout takes candy corn to another level! By using coloured plain paper, you can create the effect of candy corn. How fun is this? This is such a cute layout! The fluttering ghost is a great addition, too!
This layout features one main photo that is sandwiched in between two big and bold pieces of torn patterned paper. The little details in this layout are fantastic. I love the spider webs peek out from beneath the scrapbook paper.
The photo is perfectly matted with some complimentary plain coloured paper. This is a super fun single photo layout.
So, don’t be afraid to get bold with your paper choices!
The next Halloween scrapbook layout uses paper that you wouldn’t expect! Flowers! This layout also uses large rectangles of paper for the background. The dark blue contrasts so well against the colours in the photos and the patterned papers.
The tags as a little banner are an extra little treat on this page. As well as the stars. This is a fantastic showcase of using patterned paper that’s not necessarily a Halloween theme.
The next layout has some fantastic colour-blocking, but with patterned paper! The striped paper at the back looks fantastic paired with the dots below.
The muted tones in this paper collection make the photo really pop. Photo mats of traditional orange and black round out the layout nicely.
I am a sucker for flag ends on strips of patterned paper! I find it is more visually interesting than a straight edge. This is one of my favourite Halloween layouts because the colours and style of the layout are just so fun!
The big star really draws your eye to the photo as it looks like it is pointing to the people in it. Such a clever way to use a star!


5 Dangerous Die-cut Layouts
One of the great things about scrapbooking is that you can be as creative as you want. If you want to create spooky scrapbook layouts, there are a few different ways that you can do it. You can use an electronic die-cutting machine to create amazing titles, backgrounds, and other fun shapes. It really takes the hard work out of creating a stand-out layout.
If you’ve been wondering if you need a die-cutting machine, head over to this blog post for a comparison of the leading machines.
The title and stars have been cut out in the first example of a layout using a cutting machine. I love how the stars are also cut out. For a layout like this, you would have an idea about how you would want it to look, then use the software to place your text and images to cut.
The patterned paper underneath the cut-out section is brilliant. The text paper is soft so it doesn’t distract your eyes from looking at the photos and journalling. I also love the way the title has been sewn over. It’s a really fun and creative way to use sewing on your layout.
And one last thing! The use of the vellum photo mat. It’s one of my favourite things to do because it softens the colours of the papers underneath. Such a great layout.
If you want an epic title block for your Halloween scrapbook page, then you’ll love this next layout. The buttons for the middle of the letters are such a great idea. One of my favourite things about this layout is the use of non-traditional Halloween colours. It’s such a bright and fun layout.
The use of smaller photos along the top of the page draws your eye to the top. The layering of patterned papers underneath adds some contrasting designs to the layout.
This layout also has a fantastic title block, but it uses Halloween images too, which is why it’s one of my favourite pages to share with you. I love the colours that were chosen to back the title too. Again, non-traditional colours were picked. The fun papers backing the die cut look great! The paint splatters on the background add great visual interest.
Another fantastic layout, but this time using a die-cut shape of a heart. I like the use of the heart because it’s not your normal Halloween icon. Don’t think you have to only use Halloween supplies on your layout! Feel free to use whatever you want, there are no rules of scrapbooking!
The paint splatters add something extra to this layout too. I really love using paint and ink as an embellishment. It’s easy and quick (except for the drying time!) I also have to mention the black tag tucked under the photo. Tags are great to use as photo mats or places to have an embellishment cluster.
Halloween scrapbooking ideas don’t come much grander than this. The pumpkin die-cut background is amazing. And I love the more traditional colours used to back the pumpkins, my favourite is the bat paper.
This is a great way to show off lots of different papers. You may be better off purchasing a smaller pad of paper, maybe 6″x6″, so there is less paper waste. The use of the black and white photo means that it will go with any colours you decide to use.
SILHOUETTE CAMEO
This is a great electronic die-cutting machine for all your craft needs. It is so versatile as it cuts many different materials.

5 Creepy Halloween Title Ideas
Ok, so these Halloween scrapbook page titles aren’t going to be creepy, I just wanted to create a fun heading for this next section!
There are so many great Halloween scrapbook titles you can use on your layout. Here are 15 fun ideas to get your creative juices on the move:
- “Trick or Treat?” – This is a classic title for any Halloween layout.
- “A Night of Fright!” – Perfect for a spooky layout with lots of ghoulish details!
- “Happy Halloween!” – A festive way to celebrate the holiday!
- “What Trick-or-Treaters Taught Me About Life” – A unique and creative way to document your Halloween memories!
- “Witch’s Brew” – Create a spooky and atmospheric layout with this title!
- “A Spooktacular Night!”
- “Happy Haunting!”
- “Wicked Fun!”
- “A Frightfully Good Time!”
- “A spooky night!”
- “Witchy fun!”
- “Spooky memories!”
- “Happy haunting!”
- “Sweet spooks!”
- “Too cute to spook!”
If you want Halloween-themed funny scrapbook titles, then this one is perfect! I actually laughed out loud when I read the title of this page. What a great idea to use a rhyme or a saying as a title, especially if it holds a dear memory. I hope this title was cut out using a cutting machine, otherwise, it would have taken so long to do!
One thing that I really like about this layout is the ghost popping out from behind the black cardstock. The strip of black polka dot washi tape over the green patterned paper also looks great. Don’t be afraid to mix your craft supplies on your layouts. Lastly, the three different types of circles in the bottom left-hand corner are fab.
If you’re looking for a fun and easy way to dress up your scrapbook pages this Halloween, consider using puns for your page titles. Just like this layout with its Fa-Boo-Lous title! I’m not great at thinking of puns, but you may be the pun-wizard. Using puns is a great way to add a bit of humour to your layouts and show off your personality.
What I specifically like about this layout is the background made of triangles. It’s a great way to use up pieces of patterned paper that may not be Halloween-themed. The cute little embellishments are a great addition to this layout.
Have you got left-over letter stickers that you’ve been struggling to use? Why not combine different types of letter stickers in one heading? This delightful layout has a fantastic title using letter stickers and chipboard letters. It creates a fun effect.
Special mention goes to the black and orange feathers that are poking out from under the photo. The symmetry of this layout feels really balanced, too. The washi tape cut into banners is also a great addition to this layout.
One way to add a festive touch to your pages is to use stamps. There are lots of different types of stamps available, from cartoon characters to seasonal images to alphabets. There are several ways to use stamps on your scrapbook pages. One option is to stamp the image directly onto the page. Another option is to stamp the image onto a piece of paper and then attach the paper to the page.
This layout uses both of those techniques. For the title block, the letters have been stamped directly onto a piece of patterned paper, and then attached to the layout using stitching and staples. A roller date stamp has been used as a background stamp. The way the stamp has been used over and over again creates a great effect.
You can add lots of little details to make your pages come alive. One easy way to create a catchy title for your page is to use a banner. Banners are a great way to add some extra interest to your page, and they’re really easy to make. Simply make small angled cuts to a strip of paper and you have a banner!
This layout has created a fantastic BOO! banner. I really like the little pumpkin embellishments in a row at the top of the page. The different stars are a great addition too. There are puffy stickers, chipboard sticker, and sequins. Don’t be afraid to mix and match your supplies!
ALPHABET DIES
You can make as many scary Halloween titles as you like with these metal dies. If you’ve got a Big Shot or another manual die-cutting machine, you can use these dies to cut out any word you like!

5 Petrified Pumpkin Carving Layout Ideas
If you’re looking for a fun and festive way to scrapbook your fall memories, consider using a pumpkin carving theme. This can be as simple as including a few photos of your carved pumpkins, or as elaborate as creating an entire layout around the pumpkin theme.
Towards the end of October is a great time to start thinking about your pumpkin designs and how you are going to scrapbook them!
There are so many interesting parts to this layout. Every time I look at it, I find something else to see. The raven with the leaf collar is so striking. The zig-zag stitching on this layout is perfect, especially as it highlights the embellishments near it. The long banners under the title block are really eye-catching. But my favourite part is the cute pumpkin carving in the photos!
This type of layout can be easily created by using patterned papers in orange, black, and blue, and incorporating images of pumpkins and other Halloween-related items. You can also use stickers, stamps, and other embellishments to add extra interest to your layout. If you’re feeling adventurous, you may even want to try creating a pumpkin out of paper or cardstock!
This layout shows you that you don’t need Halloween paper to make your layout either. The bats are a great feature of this layout, especially with the gem, as it makes them pop. Another technique you can try is to draw around the edges of your patterned paper with a black pen. This can be done instead of ink for a similar but different effect.
A great idea for spooky scrapbook layouts is to alter the photos. The photos on this layout have been changed to black and white, with just the pumpkin being left in colour.
There are a couple of ways you can do this. My go-to photo editing software is photoshop. To create this effect I would copy the photo and add it to a new layer. Then change the top layer to B&W, then carefully use the eraser tool to rub out the bit of the photo where I want the colour to show through. So, in this example, I would rub out the pumpkins on the top layer.
The circle in the background emphasises the circles of the pumpkins. The title along the curve looks fantastic. And the gem swirl after the bat which signifies motion is a great addition to this layout.
I’m not sure if I love the layout or the pumpkin more! This pumpkin is perfect for Halloween night. It’s so creative and fun and slightly less scary than traditional carved pumpkins!
The stitching around the edges of the patterned paper creates a border that is visually appealing. I really like the use of the vellum with stars as it adds interest without being overwhelming. The title is fantastic too.
This layout uses fall colours to match the pumpkin carving photos, rather than the more Halloween-focused palette. The use of vellum speech bubbles is a great way to fill up the white space on the right side of the photos.
The mix of different letter stickers for the title is a great way to use up leftover letters. I also like the use of non-traditional embellishments. Opting for more general ones instead of Halloween.


3 Evil Halloween Party Layouts
Halloween parties are a great way to capture lots of photos and memories at this time of the year. Make sure you take lots of happy snaps of all the guests in their wonderful costumes!
Halloween party scrapbook titles don’t come much better than on this layout! The use of the stars in the middle of the letters is just too cute!
The background papers are meant to look like they are in a filing cabinet. This effect is easily created by using tab embellishments. You can buy these premade, or you can use a punch to make them yourself. The paper clips are also super cute. Such a great, fun page!
TAB PUNCH
This tab punch is the perfect tool to have in your scrapbooking kit. It makes it so easy to create tabs for your layouts!

This layout is bold in the choice of dividing the page in two by using contrasting colours, one side orange and the other black. The black elements are continued on the orange side and the orange elements are continued on the black side, giving the layout balance.
The banner is charming, using a mixture of both washi tape and cardstock that’s been embossed. The cluster on the right-hand side adds interest for the eye. The circle in the middle of the page brings both sides of the layout together well.
SPIDER WEB EMBOSSING FOLDER
If you want to emboss your banner like in the layout above, then you’ll need a Halloween-themed embossing folder. This spider web folder is great not only for banners but for embossing photo mats too. If you have a Big Shot or a similar machine, that’s all you need to use this folder.

Ok, so probably not a party, but this layout is too cute not to share! The black background makes the bright blue really pop. These gorgeous papers from Doodlebug Designs are perfect for Halloween layouts!
The monsters across the top of the page are so cute, especially with their googly eyes! I sure hope the kids got lots of candy!
GOOGLY EYES
The chances of you needing 500 googly eyes are probably low, but never zero! So grab your googly eyes now to add to your cute Halloween layouts!

3 Gruesome Disney Halloween Scrapbook Layouts
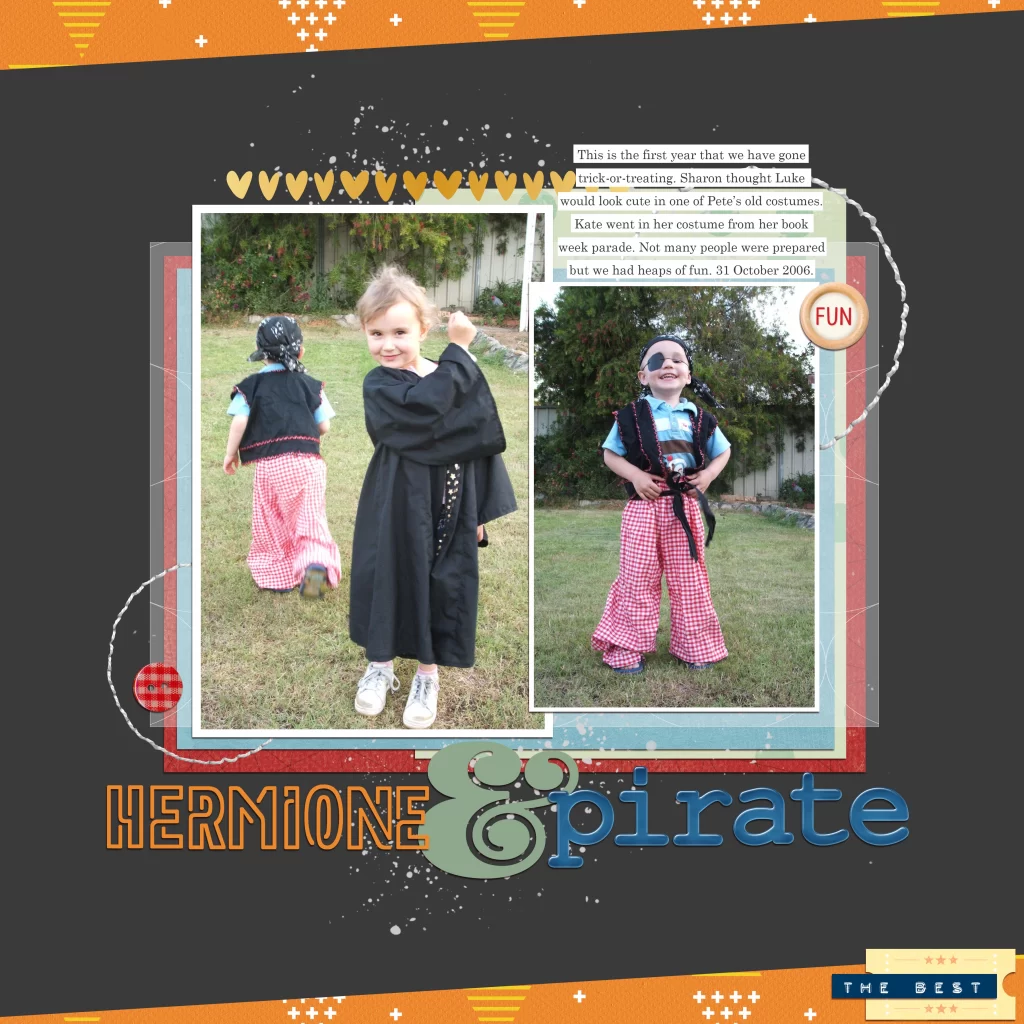
Halloween and Disney go together like peas and carrots! There is so much fun stuff happening on this page. The Halloween colours work perfectly with these photos, even though there’s no pink to be found.
The paper strips turned into banners look great and it gives the page something extra. The crochet heart really finishes the layout off.
If you have multiple Halloween photos that you want to showcase, this layout shows you how. Featuring six different-sized photos, it shows you can capture many memories on one page.
The bat paper is super cute, and so are the Disney Halloween stickers! The ghost and other stickers poking out from behind Goofy and Minnie are a great addition.
Who doesn’t love a Disney character in a Halloween costume?! This layout is a great showcase for three large-sized photos. The black mat really brings out the pumpkin face in Donald’s costume.
Other highlights of this layout are the pumpkin stickers scattered around, and the orange spotty paper for the background. A great layout with lots of varied elements.


3 Wicked Halloween Project Life Pages
If creating pocket pages is more your thing, then you may like the following three examples of Halloween project life spreads. Alternatively, you can add a project life page protector in amongst your normal layouts. Don’t be afraid to mix and match in your albums. Pocket pages are fantastic if you have many photos from one event.
This Halloween pocket page spread is a 6″x8″ size. The shaker pocket with pumpkin confetti is so cute! To make a shaker box like this, one of the easiest ways is to sew the edges so close the opening, alternatively, you can use a Fuse tool.
Such a simple design, but this spread is able to capture four unique aspects of the day.
Capturing six photos, this project life spread has everything you need to remember your Halloween. One thing to note, this is a digital page. Even still, that ghost card is the cutest.
Another digital project life page showcasing seven photos. That is one of the best things about this style of scrapbooking, you can add so many photos!
The journaling cards are great, my favourite is the Keep Calm and Spook On one in the top left-hand corner. The other thing I like about this layout is the spiders as they look quite realistic.

4 Menacing Halloween Mini Albums
One of my favourite Halloween album title ideas is Enter At Your Own Risk!
The first mini-album share is so delightful! One of my favourite things with these types of albums is the mixing and matching of different sizes and shapes of papers, page protectors, envelopes, and anything else!
This album also has some cute shaker pockets. They are a great way to use up little embellishments and pieces of ephemera.
The next mini-album is a showcase of amazing Halloween papers, photos and other themed goodies. It’s a ring-bound album, which is simple to make with a standard hole punch (if you are making the album from scratch).
The little ribbon tabs on the edges of the pages are a sweet addition. My favourite element would have to be the yellow Halloween card on the first page. I love the vintage feel to it.
This is such a cute idea for an album. It looks similar to a document wallet, but it opens up to reveal pages of Halloween memories. This type of album should be relatively simple to make as the pages are 6×12 pieces of paper folded in half. The outer wallet part would be more difficult to make, but it probably isn’t too hard to work out.
Alternatively. you could take a standard album and just decorate it with a Halloween theme! Plain chipboard albums are the best for this, but suing whatever you have could work fine too.
I can just imagine this album filled up with a page from each year. It would be such an amazing album to look back on as it would hold so many memories and stories.


2 Haunted Halloween Home Decor Ideas
This Halloween, get into the spirit of the season by decorating your home with scrapbooking supplies. With a little creativity, you can create spooky and festive home decor that will add some extra fun to your holiday.
The perfect home decor item for the scrapbooker is this photo-filled bat silhouette. I thought it was such an amazing idea when I saw it. I would never have thought to make something like this!
With photos from Halloween past, it would bring back so many memories every time it was put on display. It is simple in its design, but so effective.
And for the final idea, here is a rolled paper wreath that you can make to hang in your home.
Final eerie thoughts
Scrapbooking layouts for Halloween can be a lot of fun! There are many different ways to create them, and they can be as simple or complex as you want them to be. From mini-albums to pocket pages, to digital layouts, make sure you capture your Halloween moments.
Hopefully, this article has helped you find the perfect title and inspiration for your next layout. So get creative and have some fun with your scrapbooking this Halloween!
More spine-chilling articles
What should my scrapbook be about? 20+ ideas!
The perfect scrapbook titles for couples layouts
The ultimate scrapbooking guide for beginners
Pin this article for later!